The Rise of IoT-Enabled Smart Thermostats

Image Source: Johannes/stock.adobe.com; generated with AI
By Joseph Downing, Mouser Electronics
Published March 13, 2025
Imagine a home where the heating and cooling systems are not just automated but intelligently managed to optimize comfort and efficiency. This is the promise of Internet of Things (IoT)-enabled smart thermostats, a technological advancement reshaping how we control our indoor environments. Understanding this evolution is crucial for both seasoned electrical engineers and curious consumers.
IoT-enabled smart thermostats are advanced devices that integrate traditional thermostat functions with the power of the IoT. These systems allow for remote monitoring and control of heating, ventilation, and air conditioning (HVAC) systems, providing real-time data on room conditions and energy usage. These thermostats are beneficial for both industrial and residential spaces. Their ability to provide detailed insights and control over HVAC systems makes them invaluable for improving energy efficiency and reducing operational costs.
This project will examine the components, software, and steps necessary to build a proof-of-concept centered around smart thermostats, highlighting several Renesas Electronics solutions.
Project Materials and Resources
Project Bill of Materials (BOM)
- Renesas Electronics EK-RA2A2 Evaluation Kit
- Renesas Electronics U159-DA16200MEVZ DA16200 Pmod™ Board
- Renesas Electronics US082-HS3001EVZ Humidity Sensor Pmod™ Board
- Seeed Studio Grove Electricity Sensor
Project Code/Software
- Renesas e² studio
- Renesas RA Flexible Software Package
- J-Link RTT Viewer
- Python for Windows
- Mouser GitHub Repository for the Renesas RA2A2 Smart Thermostat Project
- DA16200 SDK Update Guide
Additional Resources
Additional Hardware
Project Technology Overview
Renesas Electronics EK-RA2A2 Evaluation Kit
The Renesas Electronics EK-RA2A2 Evaluation Kit (Figure 1) is a comprehensive tool to help engineers evaluate and develop applications with the RA2A2 MCU Group. This kit is particularly useful for creating embedded systems, leveraging Renesas’ RA Flexible Software Package (FSP) and e² studio integrated development environment (IDE). The kit’s key features include the following:
- MCU native pin access: Direct access to the microcontroller’s pins, allowing for detailed hardware-level interaction.
- System control access: Interfaces for managing and controlling system operations, enhancing flexibility in application development.
- Ecosystem access: Compatibility with various ecosystem add-ons, enabling the integration of additional functionalities and peripherals.
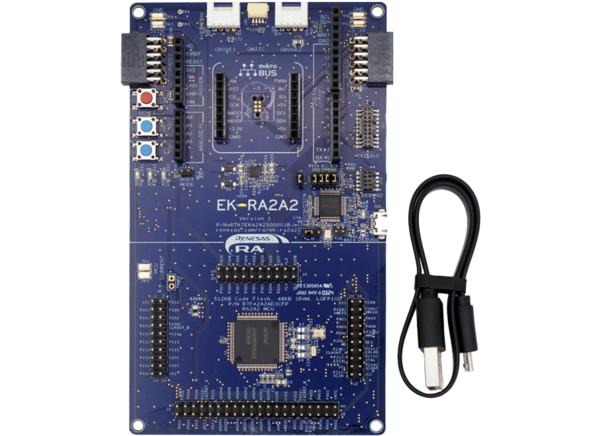
Figure 1: Renesas EK-RA2A2 Evaluation Kit. (Source: Mouser Electronics)
This kit empowers engineers to transform their innovative ideas into practical, real-world applications—such as industrial automation, household devices, and energy management systems—making it an essential tool for modern embedded system development.
Renesas U159-DA16200MEVZ DA16200 Pmod Board
The Renesas U159-DA16200MEVZ DA16200 Pmod board (Figure 2) is designed to provide seamless Wi-Fi integration to Pmod-equipped development boards. This board features a standard Pmod Type 3A (expanded UART) connection, making it compatible with a wide range of Pmod-enabled devices.
At its core, the board incorporates the Renesas DA16200MOD module, which is based on the DA16200 system-on-chip (SoC). This module offers robust wireless performance, ensuring reliable and efficient Wi-Fi connectivity. The Type 3A Pmod connector simplifies the integration process, allowing engineers to quickly add Wi-Fi capabilities to their projects without extensive modifications.
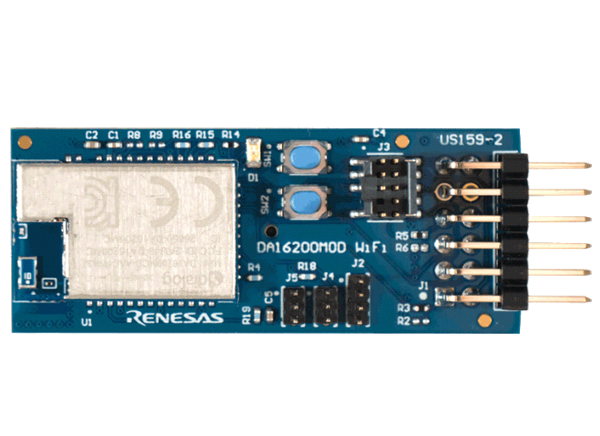
Figure 2: Renesas U159-DA16200MEVZ DA16200 Pmod board. (Source: Renesas Electronics)
Renesas US082-HS3001EVZ Humidity Sensor Pmod Board
The Renesas US082-HS3001EVZ Relative Humidity Sensor Pmod Board (Figure 3) is an excellent tool for engineers and professionals looking to streamline their prototyping process with the HS3001 humidity and temperature sensors. These sensors provide high reliability, long-term stability, precise measurements, and rapid response time.
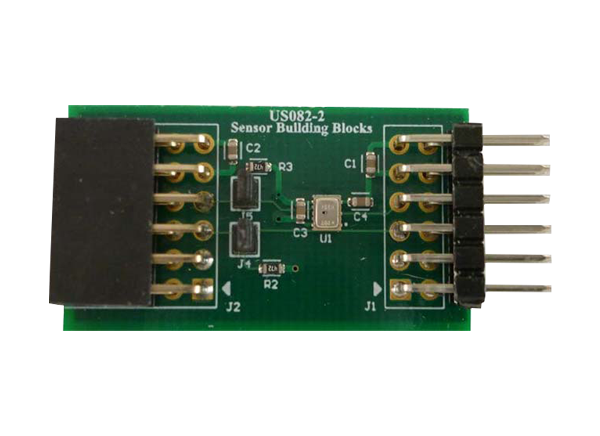
Figure 3: Renesas US082-HS3001EVZ Relative Humidity Sensor Pmod Board. (Source: Mouser Electronics)
The board features a standard Pmod Type 6A (extended I²C) connection, facilitating easy integration with any MCU evaluation kit that has a compatible connector. This design includes Pmod connectors on both sides, enabling engineers to daisy-chain multiple Type 6/6A boards. This allows for the connection of multiple sensors to a single MCU Pmod connector, enhancing the flexibility and scalability of system designs.
Additionally, e² studio software support simplifies the development process by generating the necessary code to connect the sensor and the MCU, significantly reducing development time.
Software Overview
e² studio IDE and Coding Tool
e² studio is an Eclipse-based IDE specifically designed for Renesas microcontrollers. It builds upon Eclipse’s powerful code editor by incorporating a wide array of advanced features tailored to streamline and enhance the development process.
e² studio allows engineers to manage the entire development lifecycle efficiently. From the initial stages of downloading sample code to the intricate process of debugging, e² studio provides comprehensive support. Its extended functions include sophisticated debugging tools, project management capabilities, and seamless integration with various Renesas development tools.
RA FSP
The Renesas RA FSP is a comprehensive and advanced solution tailored for engineers working on embedded system designs based on the Renesas RA family of microcontrollers. It ensures seamless software compatibility across the entire RA family, from entry-level to high-performance microcontrollers, making it a versatile choice for a wide range of applications.
Key Features and Benefits
- Advanced security
- Arm® TrustZone®: Incorporates advanced security features to protect your IoT devices from potential threats.
- Secure IoT development: Facilitates the creation of secure, connected IoT devices using production-ready drivers and middleware stacks.
- High-performance HAL drivers
- Efficiency: Offers best-in-class Hardware Abstraction Layer (HAL) drivers that deliver high performance with a low memory footprint.
- Integration: Simplifies the implementation of complex modules like communication and security through integrated middleware stacks, including Azure RTOS and FreeRTOS.
- e² studio IDE
- Intuitive configurators: Provides user-friendly configurators that streamline the setup process.
- Intelligent code generation: Enhances programming and debugging efficiency, making development faster and easier.
- Open software ecosystem
- Flexibility: Supports various programming models, including bare-metal programming, Azure RTOS, FreeRTOS, your preferred RTOS, legacy code, and third-party ecosystem solutions.
- Cost-effectiveness: Both FSP and e² studio are available free of charge for any Renesas device, offering a cost-effective solution for developers.
Applications
- IoT devices: Ideal for developing secure, connected IoT devices with robust security features.
- Embedded systems: Suitable for a wide range of embedded system applications, from simple to complex designs.
- Industrial automation: Enhances the development of industrial automation systems with high-performance and secure solutions.
By leveraging the Renesas RA FSP, engineers and professionals can accelerate their development process, ensure high-quality and secure software, and maintain flexibility across various applications and devices.
Developing the Project
Hardware Assembly
Hardware configuration is straightforward, with one exception. The Renesas EK-RA2A2 has two Pmod connectors available: Pmod 1 supports Type-2A (enhanced SPI) and Type-6A (enhanced I²C), while Pmod 2 supports Type-6A (enhanced I²C), Type-2A (enhanced SPI), and Type-3A (enhanced UART). Since the Wi-Fi module used in this project utilizes UART, we will use the Pmod 2 connection.
- Solder a short across the pads at location EX3 on the secondary side of the board near the Pmod 2 connector (Figure 4). This cuts the connecting trace between the two pads, enabling the RXD signal and ensuring EX1 is open.
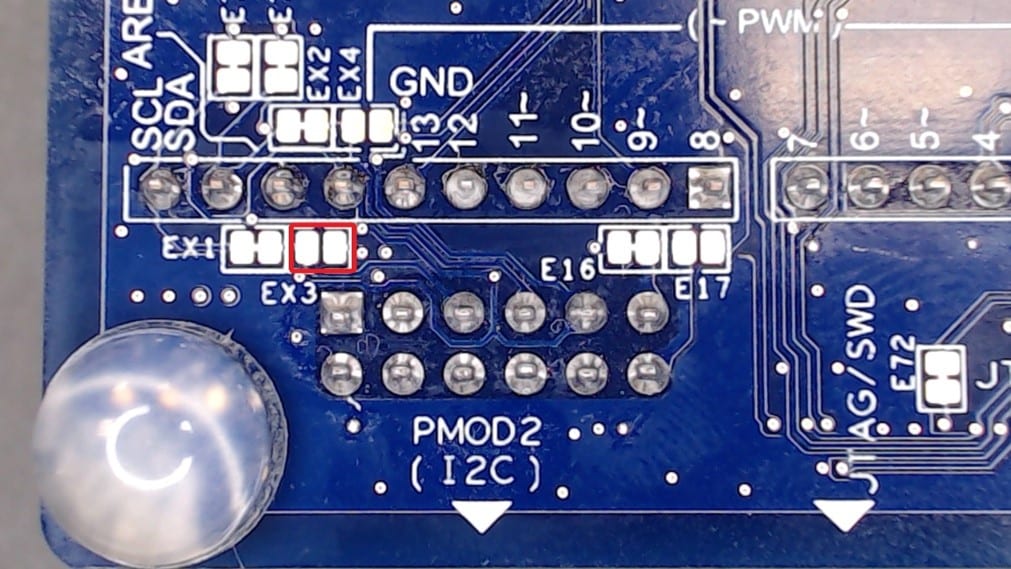
Figure 4: EX3 and EX1 locations. (Source: Mouser Electronics)
- Plug the US159-DA16200MEVZ board into the Pmod 2 connector with the module chip facing up.
- Plug the US082-HS3001EVZ board into the Pmod 1 connector.
- Plug the Grove Electricity Sensor module into the Grove 2 Connector at J28 on the EK-RA2A2 board.
Software Installation
This project requires the following software versions:
- Renesas RA FSP version 5.7.0
- e² studio version 2024-10
- SEGGER J-Link RTT Viewer version 8.10f
- GCC ARM Embedded Toolchain version 13.2.1.arm-13-7
The easiest method to download the necessary FSP and e² studio versions, as well as ensure the correct GCC ARM Embedded Toolchain is installed, is to use the Renesas GitHub link and select the option to download the FSP with e² studio Windows installer (Figure 5).
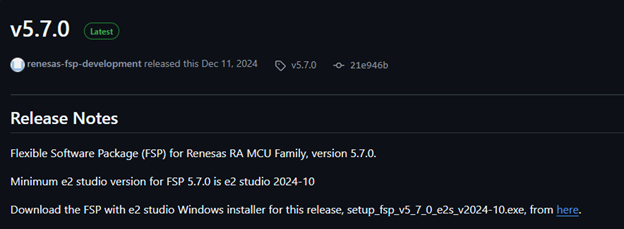
Figure 5: Renesas GitHub FSP v5.7.0. (Source: Mouser Electronics)
This will allow you to ensure you have the most up-to-date version available in one easy location. Once downloaded, complete the following steps.
- Open the downloaded Windows installer.
- Select Custom Install (Figure 6).
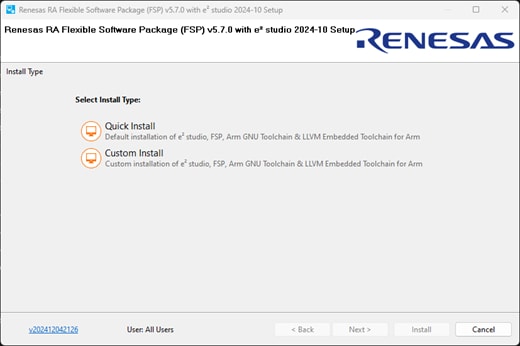
Figure 6: Renesas RA FSP Install Type window. (Source: Mouser Electronics)
- Click Next on the Welcome, Extra Features, and Customise Features screens until you reach the Additional Software screen (Figure 7).
- Select the GNU ARM Embedded 13.2-Rel1 checkbox, and then click Next.
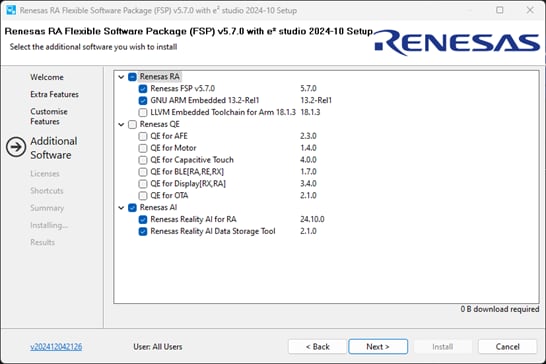
Figure 7: Additional Software selection screen. (Source: Mouser Electronics)
- Follow the remaining on-screen instructions to complete the installation.
- Navigate to the J-Link RTT website and select Downloads.
- Download the J-Link Software Windows Installer (Figure 8).
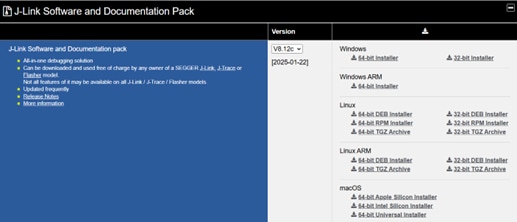
Figure 8: J-Link RTT Installer download. (Source: Mouser Electronics)
Software Integration and Demonstration
Before programming the board, you will need to update the SDK on the Wi-Fi module on the DA16200 Pmod board. The DA16200 SDK Update Guide provides instructions on how to connect the board, verify the current SDK version, download the required software, and update the device.
After updating the SDK on the Wi-Fi module, go to the GitHub repository and download the project code by clicking the green Code button and then selecting Download ZIP (Figure 9).
Figure 9: GitHub repository download link. (Source: Mouser Electronics)
Next, import the code into e² studio:
- Open e² studio.
- Click File and select Open Projects from File System.
- Click Archive (Figure 10), then navigate to and select the download folder that contains the Renesas_RA2A2_Demo
Figure 10: Import Project window. (Source: Mouser Electronics)
- Select only the checkbox for the file with the Eclipse Project label (Figure 11), then click Finish.
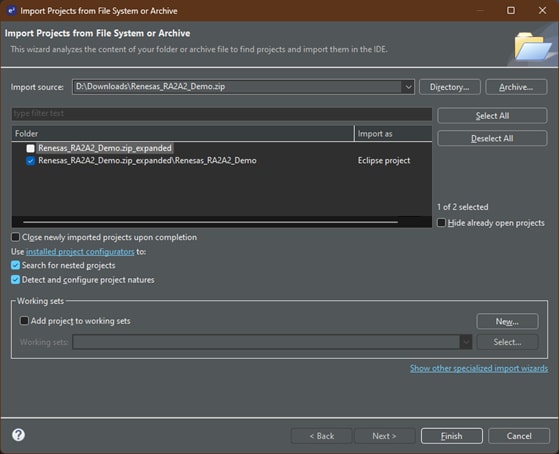
Figure 11: Import the selected project. (Source: Mouser Electronics)
- Once you have imported the software, select the project.
- Click the Build (hammer) icon or press Ctrl+B to build the project (Figure 12).
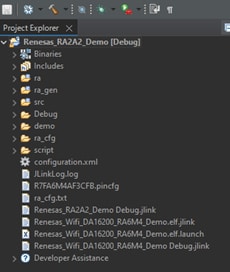
Figure 12: Imported project display. (Source: Mouser Electronics)
- Upon a successful build, the console will show “Build finished” (Figure 13).
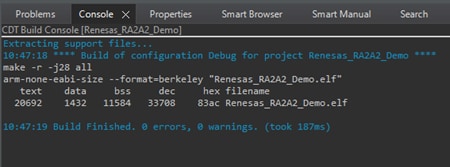
Figure 13: Successful build completion. (Source: Mouser Electronics)
- Click the Debug icon or press F11 to launch the debug mode (Figure 14).
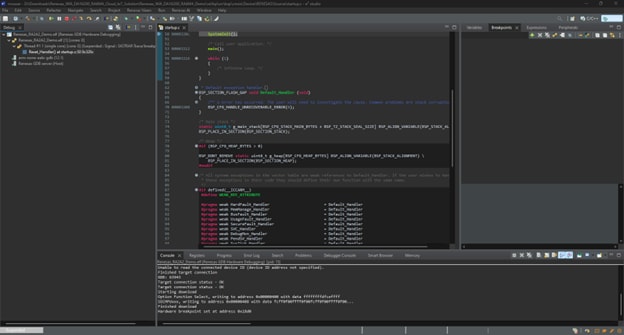
Figure 14: Debug console mode. (Source: Mouser Electronics)
- Click the Play icon to run the code.
Once the code has begun running, you will need to open your computer’s network configuration and view all available wireless networks. Select the Renesas_Wifi network (Figure 15) and enter 12345678 as the requested password.
Note: You can modify the SSID and password within the project parameters to customize for end use.

Figure 15: Renesas_WiFi network SSID in Network Settings. (Source: Mouser Electronics)
The system is configured as an HTTP server, with the PC acting as the client. Using an available browser window, navigate to “http://192.168.10.2/index.html” and view the browser interface.
Here, you can view the sensor data provided by the HS3001, pushbutton count, and LED control (Figure 16).

Figure 16: Customizable browser display. (Source: Mouser Electronics)
Conclusion
IoT-enabled smart thermostats represent a significant leap forward in how we manage our indoor environments. By combining advanced sensing, smart connectivity, and real-time data analysis, these devices not only enhance comfort and convenience but also drive energy efficiency and cost savings. Whether in homes or industrial settings, the adoption of smart thermostats is a step toward a more sustainable and intelligently managed future.