Connecting the Thingy:91 Using NB-IoT to the nRF Connect Cloud
The Nordic Thingy:91 is a low power Multisensor Prototyping kit that enables designers to kickstart a c-IoT (cellular Internet of Things) project. Thingy:91 is very similar to the Thingy:52 but with added cellular connectivity courtesy of the nRF9160 SiP. This makes it ideal for use in a variety of applications such as logistics (for asset tracking), metering and wearables. For connectivity, it supports LTE-M and NB-IoT, has GPS on board, and also supports BLE (Bluetooth Low Energy) for short-range communications via the onboard nRF52840 SoC. Thingy:91 ships with an iBasis SIM card and is configured out-of-the-box to connect to the cloud over LTE-M. However, as shown on the Mobile IoT Deployments map (Figure 1), not all countries support LTE-M. Additionally through this map, you can find which operator offers c-IoT network coverage, as iBasis roaming coverage is still limited to a list of countries (https://ibasis.com/solutions/iot-connectivity/network-coverage/).

Figure 1: Mobile IoT Deployments map showing LTE-M and NB-IoT network coverage. (Source: GSMA)
Hardware & Software Prerequisites
Reconfiguring Thingy:91 requires reflashing the firmware. As it has no debugger on board and doesn’t yet support firmware flashing through the serial port, an external programmer, such as the J-Link debugger or the nRF9160DK, is needed. In this article, we will use the nRF9160DK.
You are required to install the nRF Command Line Tools and the nRF Connect program on your PC (available to download from Nordic’s website). After installing both, connect the Thingy:91 to the nRF9160DK “Debug out” port using a 10-pin JTAG cable. Next, connect the Thingy:91 and the nRF9160DK each to the PC using a micro-USB cable (Figure 2). Before switching on, ensure the ‘VDD_IO’ switch located on the nRF9160DK is set to 1.8V and on the Thingy:91 the ‘SWD selection’ switch is set to ‘nRF91’. Finally, switch both boards ON.
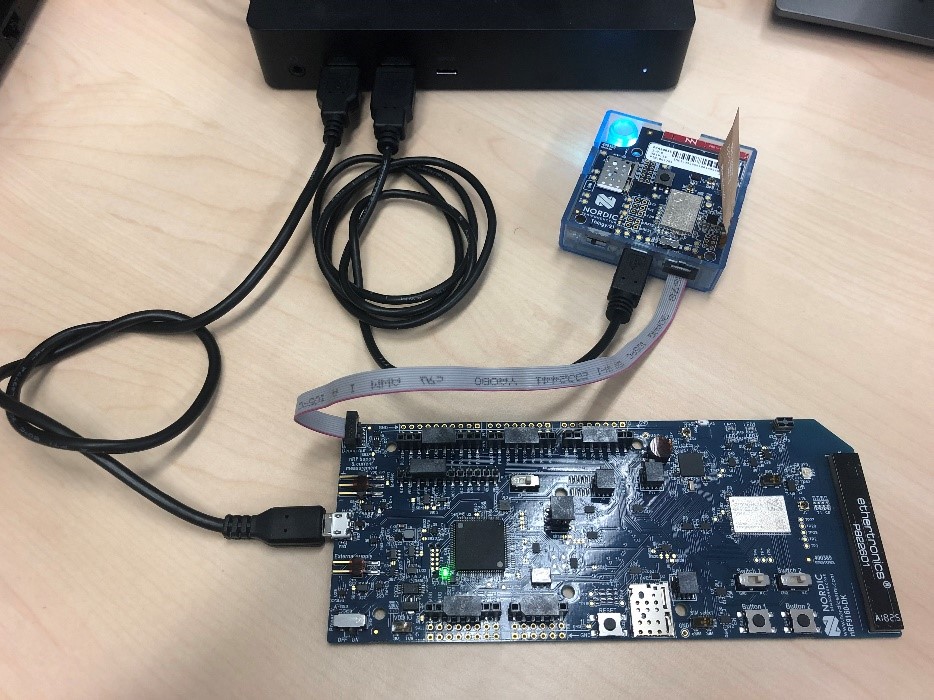
Figure 2: nRF9160DK & Thingy:91 connected to each other with JTAG cable and via micro-USB to the PC. (Source: Mouser)
Modem Firmware & NB-IoT Binaries Flashing
Open the nRF Connect program and launch the Programmer application. Click on ‘Select Devices’ and you should be able to see two devices. The first device in the list ‘PCA10090’ is the nRF9160DK and the second one ‘PCA20035’ is the Thingy:91. For flashing the Thingy:91, select the ‘PCA10090’ (Figure 3).

Figure 3: Device selection in the nRF Connect Programmer app (Source: Mouser)
Next, download the latest modem firmware and the firmware binaries for the Thingy:91, available on Nordic’s website. First, update the modem firmware of the Thingy:91 to the latest version. In the Programmer app on the right-hand panel click on ‘Erase all’ and then ‘Update Modem’. Choose the zip folder called ‘mfw_nrf9160_x.x.x.zip’ and then click on ‘write’.
Second, unzip the Thingy:91 firmware binaries folder ‘thingy91fwvxxx.zip’ and in the Programmer app on the right-hand panel click on ‘Add HEX file’. Choose the HEX file ‘thingy91_nbiot_vx.x.x.hex’ which is located in the ‘thingy91fwvxxx’ folder and finally click on ‘erase & write’. Now everything should be up to date and the Thingy:91 should be flashing a light blue color.
Connecting to the nRF Connect Cloud
In the nRF Connect program, launch the LTE Link Monitor application. Uncheck the box ‘Auto device/port filter’ which is located on the right-hand panel at the bottom. If you click on ‘Select device’, you should be able to see the DK as well as the Thingy:91. Now choose the Thingy:91 which will be visible as two devices named ‘PCA20035’ (Figure 4). Select one of them and you should see some UART logging on the terminal, if not try selecting the other one.
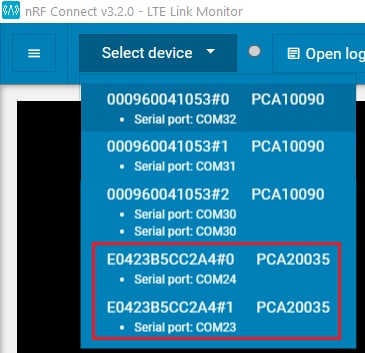
Figure 4: Device selection in the nRF Connect LTE Link Monitor app (Source: Mouser)
The Thingy:91 will be initializing and trying to connect to the cellular network so it will take several minutes. Then a message will appear in the terminal stating that the Thingy:91 is waiting for credentials to connect to the cloud (Figure 5). Also, the Thingy:91 will be flashing a green color, which means it is connected to the cellular network and waiting to pair with the nRF Connect Cloud.

Figure 5: Terminal output message showing the Thingy:91 waiting to be paired with the nRF Connect Cloud (Source: Mouser)
At this point, navigate to the nRF Connect Cloud website, log in and click on the Plus logo. Then click on the following: ‘LTE device’ -> ‘Already have an active SIM? Skip this step’ -> add the IMEI and PIN number found on a label placed on the Thingy:91 itself. You’ll get a pop-up message reporting the device has been successfully added. It will take some time (approx. 10 minutes) until it starts sending data to the cloud. A dark blue color will be flashing on the Thingy:91 as soon as it starts sending data. If this doesn’t happen in a reasonable time, reboot the Thingy:91 and check you have network coverage.
Conclusion
The Nordic Thingy:91 is a very compact device offering designers a quick and easy way to test a Multisensor device that sends real-time data to the cloud via a cellular network. The Thingy:91 comes preloaded with the asset tracker application which demonstrates the device perfectly. For custom application development, Nordic also offers the nRF Connect SDK which provides the possibility to easily adapt the device to your preferred application and start developing your own c-IoT applications.