How to Build Your Own Indoor Air Quality Monitor

By Rafik Mitry, Mouser Electronics
Published March 4, 2021
The air quality inside meeting rooms, workspaces, and vehicle cabins is vital for human health. Poor Indoor Air Quality (IAQ) can induce headaches, fatigue, and lack of concentration. Two of the main factors for poor IAQ are high carbon dioxide (CO2) and volatile organic compounds (VOC) levels. To avoid high CO2 and VOC concentration levels, an IAQ monitor can be used to notify you once high concentrations levels are detected. It can also remind you to ventilate the room with fresh air. Here, we’ll learn how to build your own indoor air quality monitor with Bluetooth®Low Energy (BLE) connectivity that can connect to your mobile device.
Project Materials and Resources
Access the project's BOM on Mouser's website for the required component:
- 579-DT100112: Microchip PIC-BLE
- 932-MIKROE-4196: Mikroe Air Quality 7 Click
Software and Tools:
- MPLAB®X IDE
- XC8 compiler
- MPLAB Code Configurator (MCC)
- BLE Terminal mobile app
Project Technology Overview
For this project, use the following products and technologies, described in the following sections:
Microchip PIC-BLE
The Microchip PIC-BLE development board is designed to quickly and easily enable BLE for any eXtreme Low Power (XLP) wireless applications. The PIC-BLE is based on the PIC16LF18456 Microcontroller (MCU). It features the ATECC608A CryptoAuthentication™ Secure Element and the RN4870 Bluetooth® Low Energy module. The PIC-BLE includes a mikroBUS™ socket enabling the addition of various 700+ sensors and actuators options offered by MikroElektronika. The PIC-BLE can be powered via a Micro-USB or a CR2032 battery. (Figure 1)
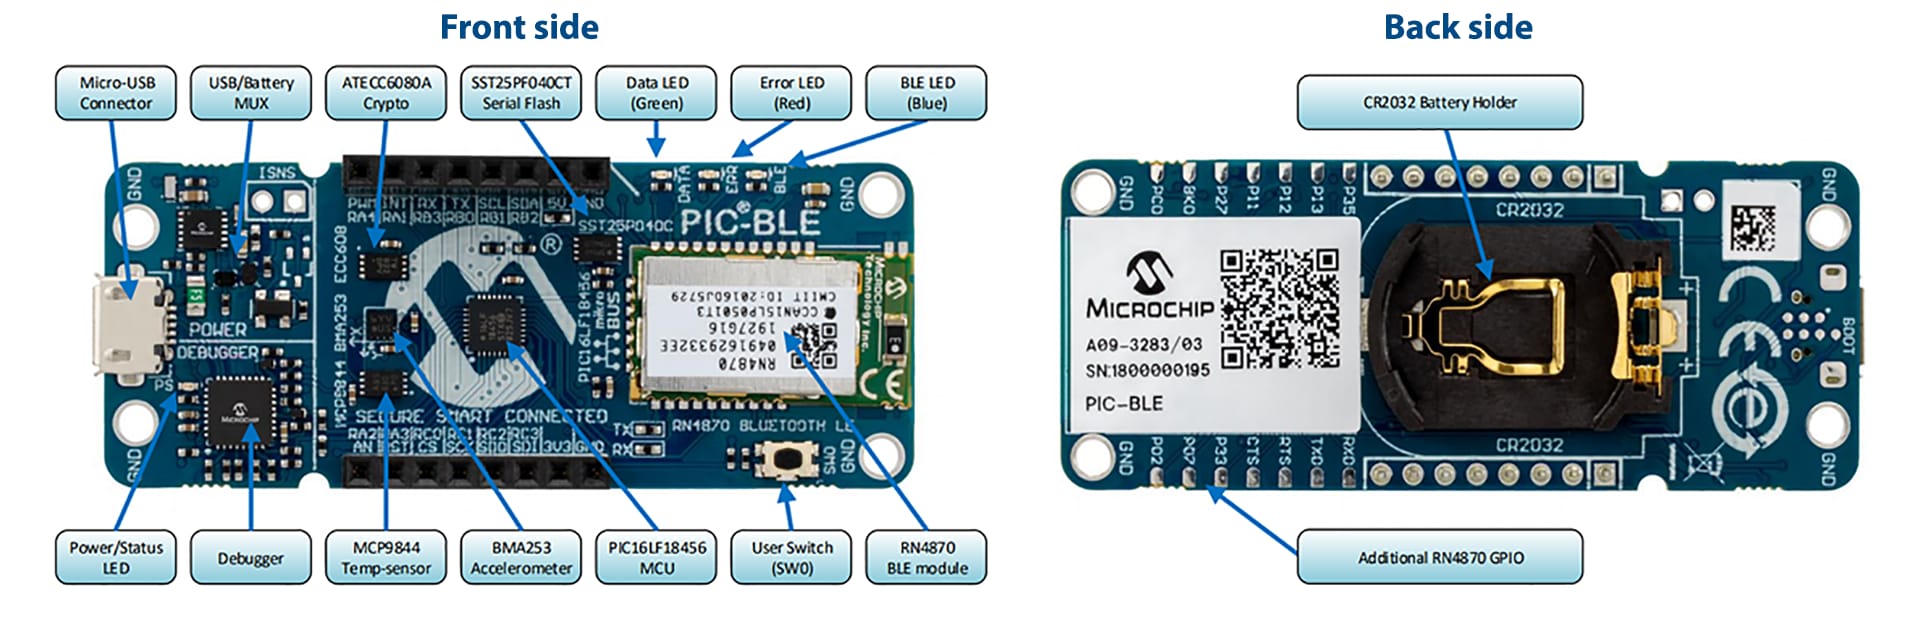
Figure 1: Microchip PIC-BLE Development Board Front and Back Side (Source: Microchip Technology)
Mikroe Air Quality 7 Click
Mikroe Air Quality 7 Click is a VOC and CO2 sensor module that uses state-of-the-art Metal Oxide Sensors (MOS) sensor technology with intelligent detection algorithms. Onboard is the Amphenol MiCS-VZ-89TE integrated sensor module ideal for indoor air quality monitoring. The Air Quality 7 Click communicates to the host MCU via the I2C interface. The board features low power, a wide VOC detection range, high sensitivity, and high resistance to shocks and vibrations, making it ideal for VOC and CO2 monitoring in confined spaces such as meeting rooms and vehicle cabins (Figure 2).

Figure 2: Mikroe Air Quality 7 Click (Source: Mouser Electronics)
Hardware Setup
Assembling the hardware parts is straightforward. Because of the mikroBUS™ socket, soldering or wiring is not needed. All you have to do is attach the Air Quality 7 Click board to the PIC-BLE development board. Ensure you connect it correctly by aligning the 3V3 pin of the Click board with the PIC-BLE board’s 3V3 pin (Figure 3).
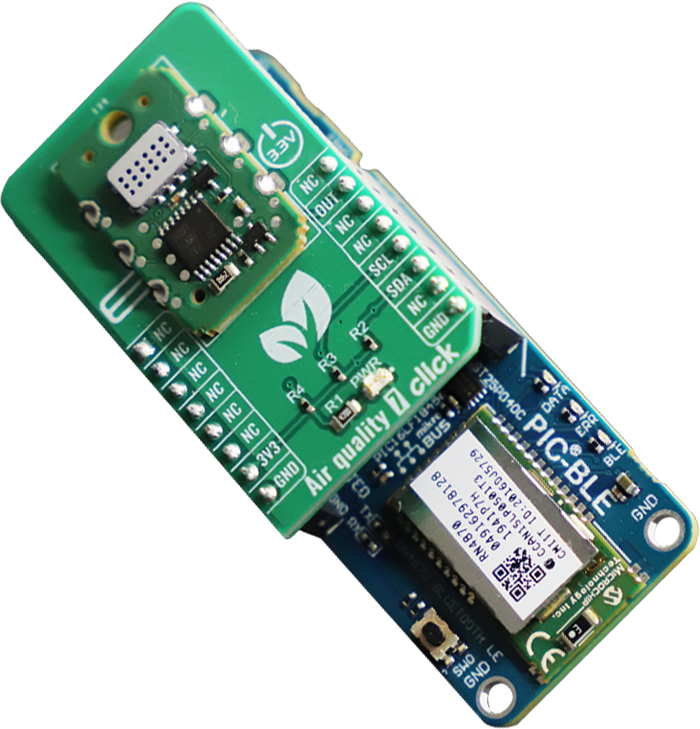
Figure 3: All parts hooked up together (Source: Mouser Electronics)
Software Setup and Programming
You can find the project file for this application on the Mouser GitHub repository. This can be easily opened in MPLAB X and flashed to the PIC-BLE board. But in the coming parts, we’ll show you how to do it yourself.
Creating a new project in MPLAB X
- Download and install MPLAB®X IDE and XC8 compiler
- Connect the PIC-BLE with a Micro-USB cable to the PC.
- In MPLAB, click on Tools → Plugins → Available Plugins → Install MPLAB Code Configurator (MCC). MPLAB will then ask you to restart the IDE.
After restarting MPLAB, click on File → New Project
In the pop-up window, select Microchip Embedded – Standalone Project, then click Next.
Select the device by typing in the devices tab: PIC16LF18456. Then, select the PIC-BLE –SN: MCHP… under Tool. If you can't see this under Tool, make sure the PIC-BLE is connected to the PC (Figure 4).
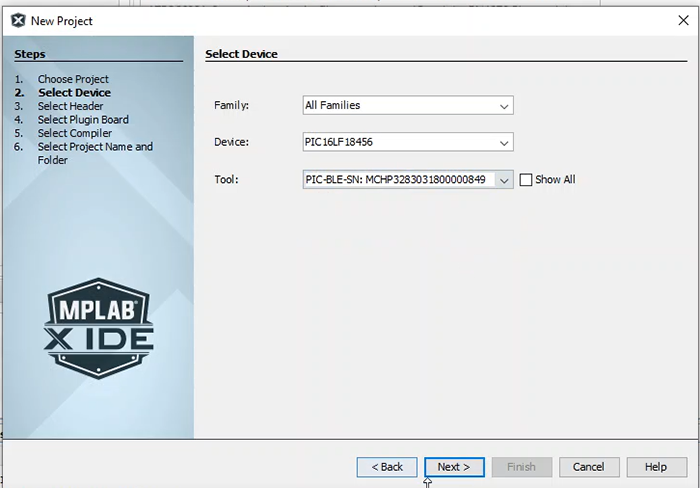
Figure 4: Selecting device and tool in MPLAB (Source: Mouser Electronics)
Lastly, give your project a name and click Finish.
MPLAB Code Configurator (MCC)
MCC is a graphical programming environment that enables and configures a rich set of peripherals and functions specific to your application. In MPLAB X, you'll find a blue icon with MCC written on it in the top panel. Select it to initialize MCC.
Under the Device Resources tab, select EUSART 2 (Figure 5) on the left-side panel.
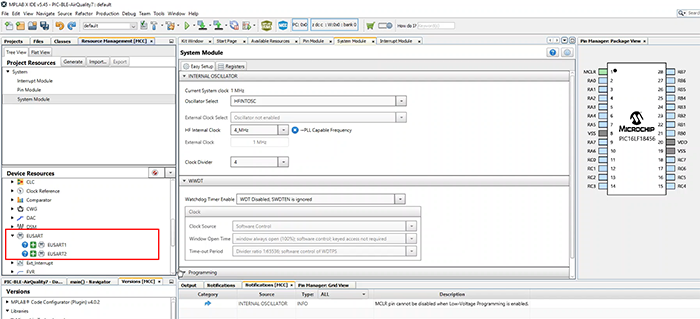
Figure 5: MCC configuration – EUSART 2 (Source: Mouser Electronics)
Under Foundation Services, select I2CSIMPLE under the Device Resources. This will add the I2C drivers to our application, which we will use later to read the Air Quality 7 Click sensor data (Figure 6).
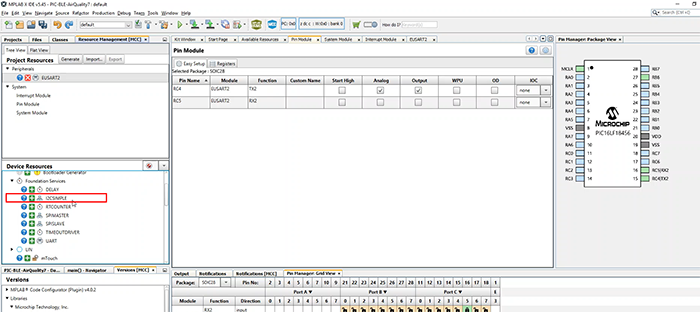
Figure 6: MCC configuration – I2CSIMPLE (Source: Mouser Electronics)
The next step is to configure our pins in the MCC pin manager. For this, you'll need to check the pin-out diagram of the PIC-BLE. The Bluetooth pins and the I2C pins are marked in the figure below.
For the BLE connection, you'll need to lock the following pins:
- RC4 → EUSART 2 TX
- RC5 → EUSART 2 RX
- For the I2C connection, you'll need to lock the following pins:
- RB1 → I2C SCL
- RB2 → I2C SDA
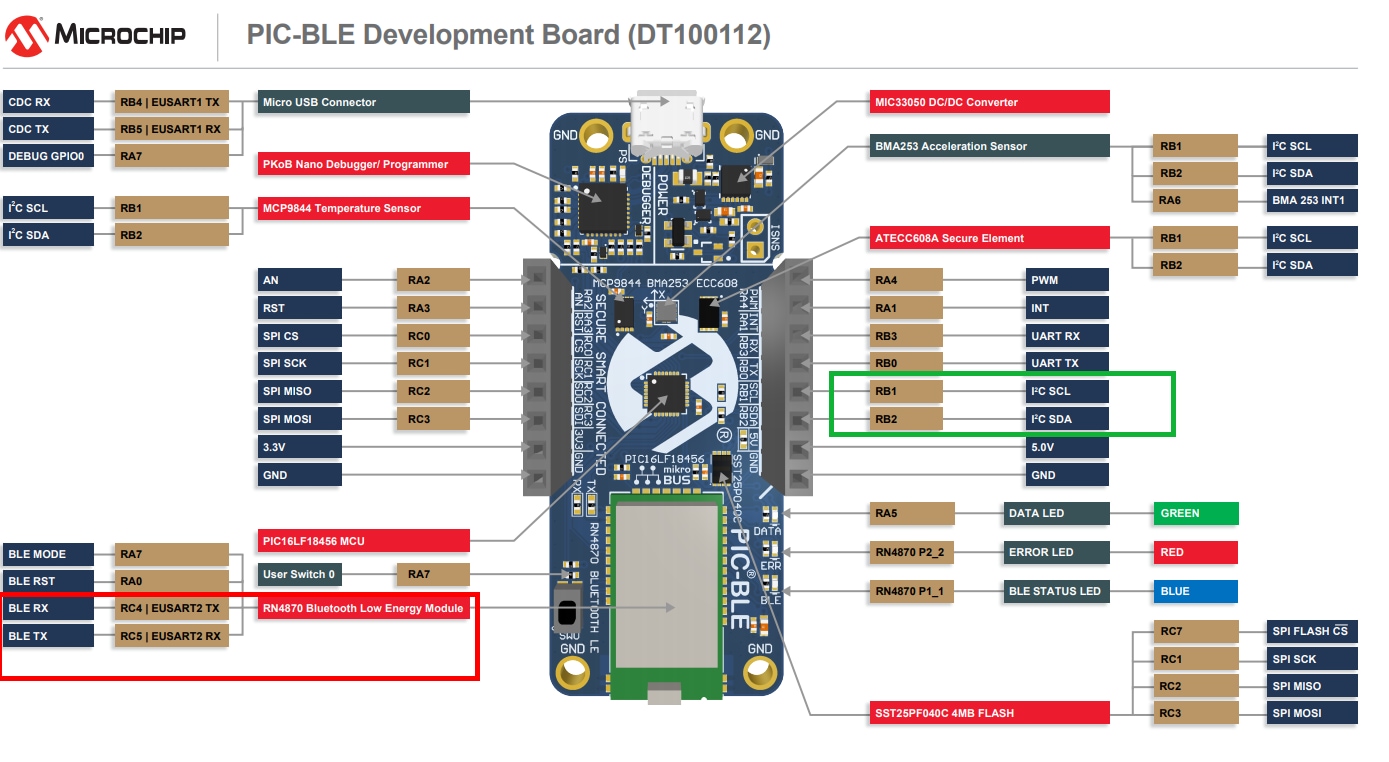
Figure 7: PIC-BLE pin-out schematic (Source: Mouser Electronics)
In the end, you should have the same configuration as in the figure below:
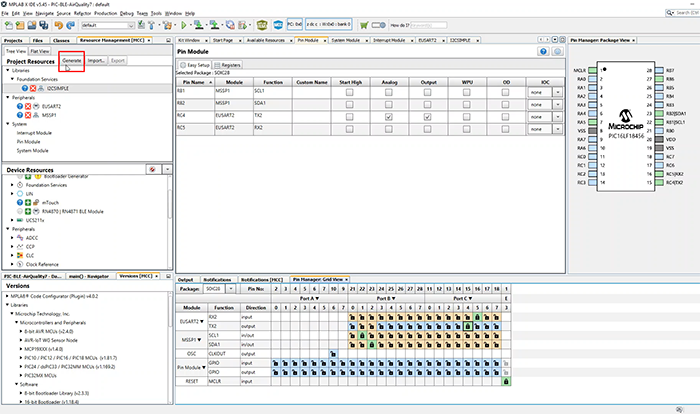
Figure 8: MCC configuration – Pin configuration (Source: Mouser Electronics)
Finally, click on Generate See (Figure 8).
Programming
In this part of the project, I'll go through the main parts on how to read the sensor data from the Air Quality 7 Click.
In the project's directory under the Header Files, you'll need to create a header file where the function that will read the sensor data is declared (Figure 9).
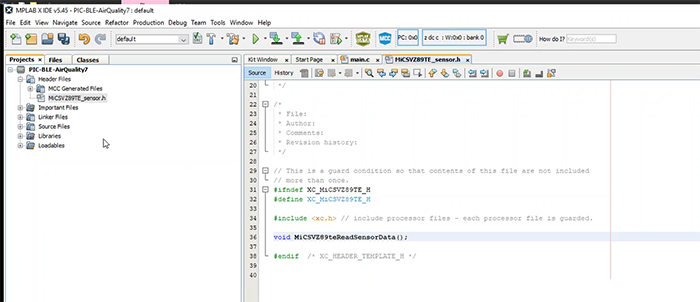
Figure 9: Programming the header file–declaring the function for reading the sensor data (Source: Mouser Electronics)
Next, we'll create a C file under the Source Files group, which will contain the code for reading the raw sensor data and converting these readings into understandable numbers (Figure 10).
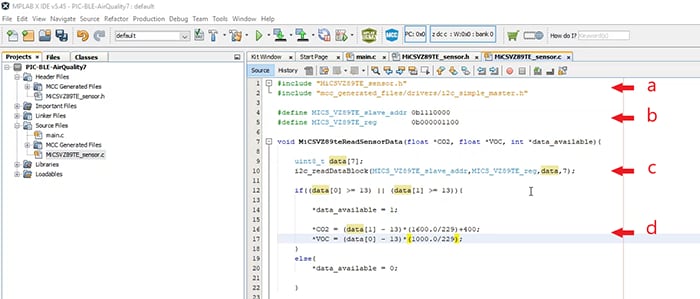
Figure 10: Programming the C file – reading the raw sensor values (Source: Mouser Electronics)
Let's go through the main points of the code figure that is attached above:
- The first thing is to include the Header file we created in step 1 and include the I2C drivers generated by MCC.
- Next is to define the MICSVZ89TE sensor I2C address and the register address, which will return an array with the sensor readings. The address and register can be found in the device datasheet.
- Inside the MiCSVZ89teReadSensorData() function, we’ll call the i2c_readDataBlock() function. The first argument is the sensor's address. The second argument is the register for retrieving the sensor data, the third argument is the array where we'll save the sensor's raw values, and the fourth argument is the size of the array.
- The last step is to check if we have data available from the sensor. If true, we convert the raw values received using the equations provided in the sensor datasheet.
The last file you'll need to edit is the main.c file, which can be found under the source files group. You'll need to include the MICSVZ89TE sensor header and the stdio library, as we'll be working with strings. Inside the while loop, we'll call the MiCSVZ89teReadSensorData() function and finally print the output to the BLE terminal on the mobile device, which I'll show you how in the next step.
With the PIC-BLE connected to the PC, click on the Make and Program in the top panel in MPLAB X.
Connecting the PIC-BLE to a mobile device
To receive the data via BLE, you'll need to download a BLE terminal app on your mobile device. Using an Android device in this tutorial, download an app called Serial Bluetooth Terminal from Google Play Store.
After downloading the app, open it and navigate to the Bluetooth LE tab. In the top panel, hit Scan to start searching for the PIC-BLE device (Figure 11).

Figure 11: BLE terminal–scanning for new devices (Source: Mouser Electronics)
Once the scanning has finished, click on the PIC-BLE device to connect the mobile device to it. As soon as it's connected, you should see the air quality data (CO2 and VOC) coming through. (Figure 12).
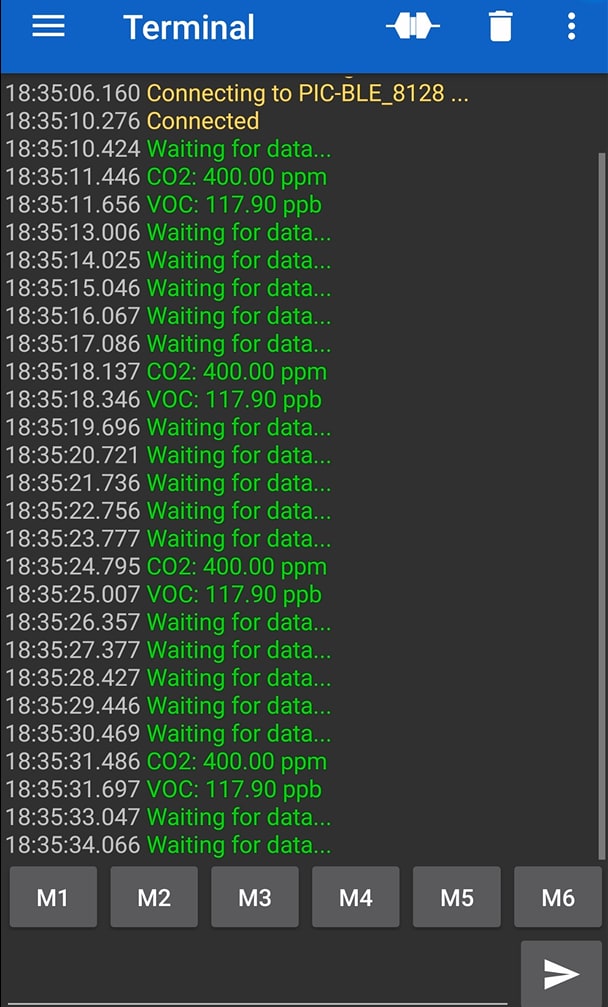
Figure 12: Receiving air quality readings via BLE (Source: Mouser Electronics)
Conclusion
We’ve provided a detailed overview of how to read sensor data via I2C and send the data via Bluetooth LE to a mobile device. Microchip PIC-BLE enables a quick and easy way of adding BLE connectivity to your application. Thanks to the onboard mikroBUS header, a Mikroe Air Quality sensor is added quickly to this application. Another feature of the PIC-BLE is that it has a CR2032 battery holder, making it ideal for a wireless sensor node.