Jump into Machine Learning with NXP

Image Source: putilov_denis/Stock.adobe.com
By Joseph Downing, Mouser Electronics
Published January 30, 2024
In the era of rapid technological advancements, edge-based machine learning (edge ML) stands out as a transformative technology, redefining how we process and analyze data in real time. This groundbreaking approach involves deploying ML models directly on edge devices, heralding a new frontier of intelligent and responsive applications. This project article delves into the realm of edge ML, exploring its significance, applications, and the myriad benefits it brings to diverse industries.
In contrast to conventional ML models that heavily depend on centralized cloud servers for extensive data processing, edge ML transfers the computational workload directly to edge devices. This unlocks the potential for instantaneous decision-making without the constant reliance on external servers. This transition addresses issues associated with latency, privacy, and bandwidth challenges inherent in traditional approaches.
The benefit of edge ML lies in its ability to provide real-time insights. By performing inference directly on edge devices, applications can respond swiftly to changing conditions, making it ideal for time-sensitive scenarios. Whether in autonomous vehicles making split-second decisions, smart surveillance cameras identifying potential threats, or healthcare devices delivering timely diagnostics, the reduced latency achieved through edge ML is a notable change.
This project article will walk the reader through the steps necessary to use the NXP Semiconductors FRDM-MCX-N947 FRDM development board in a practical application of edge ML as well as introduce the NXP eIQ® Portal for generating ML models. The MCXN947 device on the board contains an eIQ Neutron Neural Processing Unit (NPU) to decrease inference time, which in turn can improve the battery life of edge ML products. From the realms of smart cities and industrial Internet of Things (IIoT) to the domains of healthcare and consumer electronics, the potential applications exhibit both diversity and profound impact.
Project Materials and Resources
Project Bill of Materials (BOM)
Project Code/Software
Additional Resources
- MCUXpresso IDE Terminal Window, Tera Term, or other terminal emulator software
Additional Hardware
- Windows PC
- USB Type-C to USB Type-A or Type-C cable (depending on PC USB port availability)
Accounts
- NXP account (Free to create)
Project Technology Overview
The FRDM-MCXN947 board (Figure 1) incorporates the MCX N947 microcontroller with dual high-performance Arm® Cortex®-M33 cores running at speeds of up to 150MHz. The microcontroller comes equipped with 2MB of flash, optional full ECC RAM, a DSP co-processor, and an integrated eIQ Neutron NPU. The NPU significantly enhances ML throughput, delivering up to thirty times faster performance compared to a standalone CPU core. This allows the device to minimize active time, thereby reducing overall power consumption.

Figure 1: NXP FRDM-MCXN947 development board, featuring the MCX N947 microcontroller. (Source: Mouser Electronics)
The multicore architecture enhances system performance and efficiency by intelligently distributing workloads across analog and digital peripherals. The board, supported by the MCUXpresso Developer Experience, provides optimization, ease of use, and acceleration for embedded system development.
Designed for industrial applications, the MCX N94x family features a broader set of analog and motor control peripherals.
Developing the Project
This project is an introduction to the MCX N94x devices, specifically using the FRDM-MCXN947 board to provide the reader with an introduction and instructions to get the product up and running with minimal effort.
Software Installation
The software necessary for running the examples is listed below, but only the MCUXpresso integrated development environment (IDE) is required.
MCUXpresso IDE
The MCUXpresso IDE provides developers with a user-friendly Eclipse-based development environment tailored for NXP MCUs using Arm Cortex-M cores, including both general-purpose crossover and wireless-enabled MCUs. This IDE delivers advanced features for editing, compiling, and debugging, incorporating MCU-specific debugging views, code trace and profiling, multicore debugging, and integrated configuration tools (Figure 2).

Figure 2: NXP MCUXpresso IDE. (Source: Mouser Electronics)
Installation is straightforward and will require you to navigate to NXP’s MCUXpresso IDE download site. On the site, click the Downloads icon in the upper right corner, navigate to MCUXpresso Integrated Development Environment (IDE) and click Download. Follow the on-screen instructions to create an account if prompted.
On the next screens, you can choose which version you wish to download as well as which operating system (OS) you will use. This project uses MCUXpresso version 11.8.1 (you should download the most recent version) and Windows OS.
SDK Builder
The MCUXpresso SDK Builder (Figure 3) accelerates software development by providing open-source drivers, middleware, and reference example applications. The SDK Builder allows you to tailor and download a software development kit (SDK) that aligns with your chosen processor or evaluation board to streamline your development process. We will build and install the SDK in a later section.

Figure 3: NXP MCUXpresso SDK Builder website. (Source: Mouser Electronics)
eIQ Portal
The eIQ Toolkit (Figure 4) facilitates ML development through an intuitive graphical user interface (i.e., the eIQ Portal) and workflow tools, complemented by command line host tool options within the eIQ ML software development environment. Developed in an exclusive partnership with Au-Zone Technologies, NXP's eIQ Toolkit empowers developers with graph-level profiling capabilities, offering insights during runtime to optimize neural network architectures on EdgeVerse™ processors. It also provides the tools required to convert models to take advantage of the eIQ Neutron NPU.

Figure 4: eIQ Portal. (Source: Mouser Electronics)
The eIQ software is not necessary for running this example project, but it allows further development by building and implementing new models. The files required can be found at the eIQ Toolkit for End-to-End Model Development and Deployment page. Clicking the Downloads button in the top right corner, and then locate and download the latest version of the eIQ Toolkit Installer depending on your OS.
Hardware Setup
Hardware setup for this project is straightforward. Simply connect the USB Type-C cable between your host machine and the board's J17 USB Type-C port (next to SW1) (Figure 5). This will allow you to program and debug the code.

Figure 5: FRDM-MCX-N947 with USB Type-C cable attached. (Source: Mouser Electronics)
Putting It All Together
Building and Installing the SDK
Before beginning, you will need to locate and install the necessary SDK for the device:
- Navigate to https://mcuxpresso.nxp.com/en/welcome (login required)
- Click the Select Development Board
- From the Boards drop-down menu, select MCX and then select FRDM-MCXN947 (MCXN947) (Figure 6).
- Once selected, click Build MCUXpresso SDK from the Selection Details on the right side of the window.

Figure 6: NXP MCUXpresso SDK Builder development board selection. (Source: Mouser Electronics)
- Under the Developer Environment Settings (Figure 7), select all libraries, ensuring that you include eIQ Middleware.
- Click Download SDK at the bottom of the window.
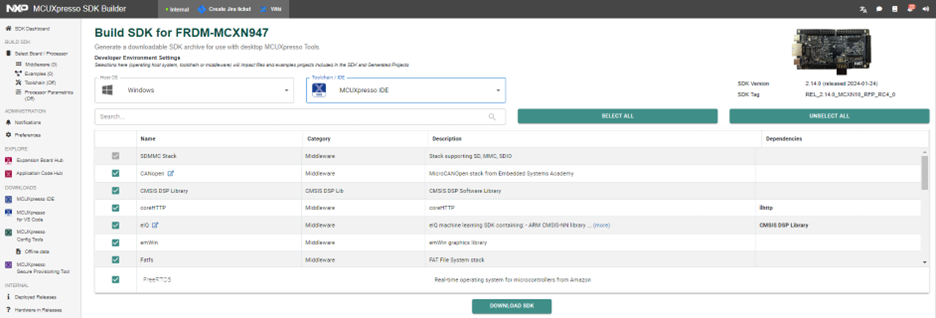
Figure 7: NXP MCUXpresso SDK Builder Developer environment settings. (Source: Mouser Electronics)
- From the MCUXpresso SDK Dashboard (Figure 8), locate the newly created SDK and click Download SDK from the right side of the specific SDK window. (This section will list all created SDKs.)
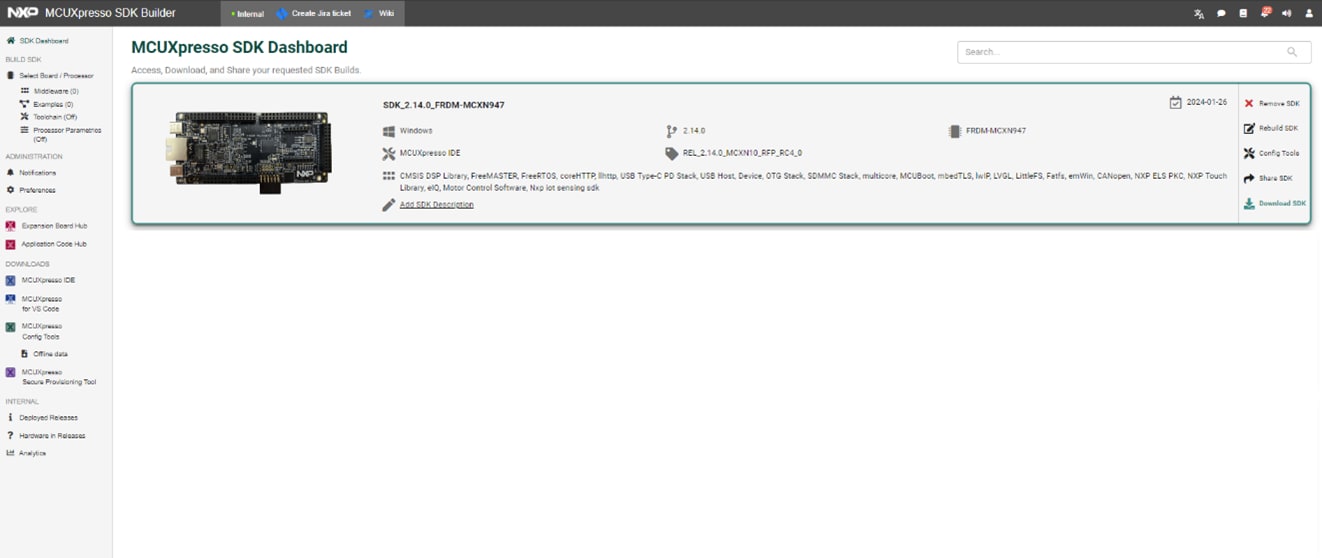
Figure 8: NXP MCUXpresso SDK Builder dashboard. (Source: Mouser Electronics)
- Open the MCUXpresso IDE if it is not already open.
- Locate the downloaded SDK file.
- Drag the zipped SDK file to the Installed SDKs window (Figure 9) to begin installation, following all on screen instructions. (Note: Location of the window may vary depending on IDE configuration.)

Figure 9: MCUXpresso IDE installed SDK list. (Source: Mouser Electronics)
Locating and Loading Example Projects
With the SDK installed, use the following steps to access example projects for testing and development of the device:
- Open MCUXpresso IDE and close the Welcome window.
- Locate the Quickstart Panel (Figure 10) in the lower left corner of MCUXpresso IDE.

Figure 10: MCUXpresso IDE Quickstart Panel. (Source: Mouser Electronics)
- Under Create or import a project, select Import SDK example(s)…, which will open the SDK Import Wizard (Figure 11)
- Select FRDM-MCXN947 from the list and click Next.

Figure 11: MCUXpresso IDE SDK Import Wizard. (Source: Mouser Electronics)
- Select the tflm_label_image demo under the eiq_eamples, as shown in Figure 11. Additional examples can be selected as well.
- Click Finish to begin importing the samples into the workspace.
A list of all the installed and available projects should be visible from within the Project Explorer window (Figure 12).

Figure 12: MCUXpresso IDE Project Explorer. (Source: Mouser Electronics)
Programming and Debugging the FRDM-MCXN947
With the example programs available from the installed SDK, you can evaluate any of the eIQ projects. For the purposes of this project, we will evaluate the Label Image example.
- From the list of available projects in the Project Explorer (Figure 12), select frdmmcxn947_tflm_label_image.
- Click the Build icon in the toolbar at the top of the IDE.
- Verify in the console that the build completed with no errors (Figure 13).

Figure 13: MCUXpresso IDE console window. (Source: Mouser Electronics)
- Right-click the same example program, select Debug As, and then select MCUXpresso IDE LinkServer.
- In the SWD Configuration window (Figure 14), select Device 0 and click OK.

Figure 14: MCUXpresso IDE SWD Configuration window. (Source: Mouser Electronics)
- Once the label image file is built and compiled, press F8 or click the Resume icon on the toolbar to continue the debug session.
- Open a terminal window (Figure 15) or other terminal emulator software.
- Select the COM port the device is assigned to.
- Set the COM port using the following settings:
- 115200 baud rate
- 8 data bits
- No parity
- One stop bit
- No flow controls

Figure 15: MCUXpresso IDE terminal window. (Source: Mouser Electronics)
The output for this example should be displayed in the terminal window, registering only a static image because no external camera is connected.
Taking It a Step Further
Of course, this is not the end of what’s possible. The eIQ Portal enables you to create models using custom image sets by simply dragging and dropping the files (Figure 16). Along with the available examples and the addition of hardware, the possibilities of image classification or real-time monitoring become a much simpler task. You can also use the eIQ Toolkit to convert existing models and take advantage of the eIQ Neutron NPU. The eIQ Neutron NPU featured in the MCX N family can significantly decrease inference times when running a model.

Figure 16: eIQ Portal Data Set Curator. (Source: Mouser Electronics)
Conclusion
The transformative power of edge ML lies in its capacity to offer real-time insights. The direct inference on edge devices enables applications to promptly respond to dynamic conditions, proving particularly advantageous in time-sensitive scenarios. Whether facilitating split-second decisions for autonomous vehicles, identifying potential threats with smart surveillance cameras, or delivering timely diagnostics through healthcare devices, the reduced latency achieved through edge ML emerges as a pivotal innovation.
This article has provided a practical guide, walking the reader through the essential steps for implementing the NXP FRDM-MCXN947 FRDM development board in an edge ML application. Additionally, it introduces the eIQ Portal as a tool for generating ML models. The showcased applications can span a wide array of industries, including smart cities, IIoT, healthcare, and consumer electronics, emphasizing the broad-reaching and profound impact of edge ML.